
Drawing Trees Tutorial 3 — part 1
by Vincent D Whitehead ©2010Trees - Midground and Distant
Mid-ground objects as they relate to the whole image are just as important as the foreground objects. We, as artists, must keep the perspective in our renderings clear and in line with what the real world if we are to produce realistic images. I love detail work but, adding detail for detail sake will create a drawing that can be too busy or over complicated. I want to give the viewer enough information in the drawing so that they can recognize the subject without over-loading the senses. Keeping this in mind, we need to move to the mid-ground portion of the drawing.
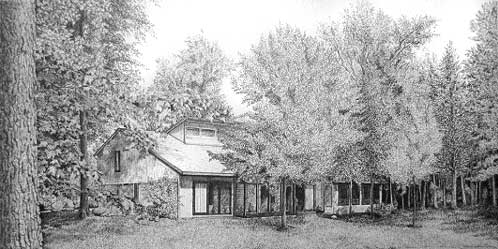
In this view of the "Gilbert Home", you can see the many different elements of the scene as it pertains to the trees. The property is loaded with them and this is one of the main reasons I agreed to do this drawing.
This is a crop close-up view of the finished drawing. Let's break it down into the three main elements of trees that we are dealing with.
- First is the foreground tree that we have already drawn. It sets the gage for the size of the rest of the trees and foliage work that is left in the scene. The leaves and the detail work are much larger and more clearly seen since they are closer to the viewer.
- Second, is the mid-ground trees. These trees are seen but, not as clearly as those in the foreground. This means that we don't draw them as large or in as much detail as the foreground trees.
- Third, we have the distant trees. They are completed in much less detail than the mid-ground trees. In fact, they are drawn by giving just an indication of shadowed spots and forms of foliage and only the smallest amount of information indicating suggestions of branches or limbs.
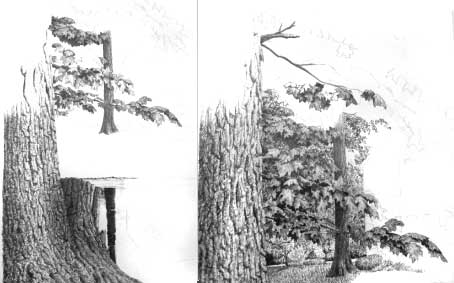
Let's start the mid-ground trees. The first one I started is the one just to the viewer's right of the large foreground tree. You can see that I started putting in the indications of this tree trunk with pretty light tones using vertical lines running in the direction of growth for this tree. I use my FINE point pen to do this with, as I said, with very light pressure.

Start with your FINE point pen and insure you have good ink flow. Then clean the tip with a tissue or paper towel. Then find where in the drawing that the tree is to be placed. Pay attention to your foliage areas that will overlap the tree trunk you are working on and leave those areas white.
! It's easier to fill in tone than to try and lift it once it is on the paper so leave areas you want lighter alone until you are ready to work them...
Then, using the same FINE point pen, begin to layer over the top of your first tone lines in the mid-ground tree trunk with lines that start from the shaded side and roll out toward the lighted side of the tree. Place the pen tip at the shaded side and roll it toward the lighted side and lift as you move. This creates a darker edge on the shaded side of the tree and a lighter tone side giving the tree depth in the viewer's eyes. You can see this in the next picture. This work is done actually very quickly. There is no need to try to define too heavily the bark lines as this tree is too far outside of the viewer's visual depth of field.
The next step is to define the darker side of the tree trunk by going over the shadowed side one more time with the FINE point pen. I do this with vertical strokes again.
You can see this in the second image of the mid-ground tree that is a close-up crop.
Next is the foliage work on these trees. This is also a job that is much easier in comparison to the foliage in the Foreground tree. Just as the tree trunk is much smaller and less detailed, so are the leaves in the mid-ground tree. The leaf areas are less than half the size of the one in the foreground tree. I use my Fine point pen again and insure that it is clean at the tip. I start by using light pressure and place smaller leaf indications running from the tree trunk out and in the direction away from the trunk and branches. Again, pay attention to how gravity will pull on the leaf clumps and direct them toward the ground at the ends of the limbs and branches. Once you have the leaf work in go back and pick out some shadowed details in the leaves. Some leaves will be left almost white with just the underside of the leaf drawn. You can see this in the next image.
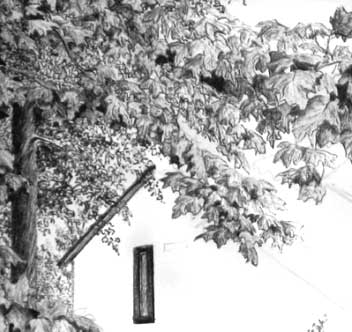
The smaller leaf indications just below the larger detailed leaf clumps are what I am referring to. These are just indications of leaves but when viewed in the whole image they will blend in as realistic leaves.
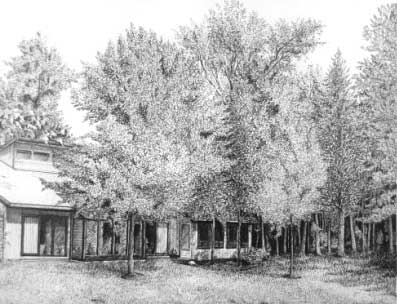
As I move to the area in front of the home, there are a few more trees that need to be placed in the drawing. They are a bit smaller than the one we just did but, are still in the mid-ground view. They are rendered much the same way as the first mid-ground tree was done. Start with the light line indications in a vertical stroke. Then put the second layer of lines over this remembering to start on what will be the shadowed side and work the stroke toward the lighter side and lift at the end.
Once you have worked in the tree trunk tones you can start the leaf clumps. This tree is in the open and middle of the scene. Because of this, the leaf work will be much brighter and full looking. Since this tree is less detailed, we again, will only be doing basic leaf shapes and less detail. Work the lines to show subtle leaf shapes from the shaded side and layer the next leaf or leaves on top of that until you have worked your way to the end leaf point.
After the leaf clumps are worked in you can go back and add in spots of shadow and tone to give you some depth in the tree. I work my way from the bottom center closest to the trunk and out until I have a full limb or branch and then I start this over layering the leaf clumps one on top the other. You can see this in the next image.

As I finish one tree I am always thinking about how this one will interact with the next. The next one will be the one beside or just behind the one I finished. This seems like an obvious statement but, can sometimes be a bit confusing when you look at a scene that is full of trees such as this one. By drawing the closest tree to the viewer all the time and working to the next one and so on until you get to the most distant ones, you can keep the brightest areas intact and place layers of leaf clumps over the more shaded areas. This will help to naturally give depth and shadow to your drawing.
Keep in mind the shadowed side of the foliage areas or leaf clumps in the trees as they will be darker the farther away from the light source as they go.
! Remember to keep your ball point pen tip clean by wiping it on a tissue or paper towel regularly.
Work through the next trees just as you did the first and second mid-ground trees paying attention to the light source and the cast shadow areas from the leaf clumps in front of the other. Fill the leaf clumps in and then go over them with light tone layers of ink to work in the shadow areas. I do this until I get the tone value I want keeping in mind where the cast shadows will fall from the trees and their foliage on the ground and the objects below and behind them like he house.
Leaf indications will get smaller as you work in the branch areas behind and below those that are closer toward the front or toward the viewer.
That's about it for the mid-ground trees and foliage. Next we will tackle the distant trees and foliage.
As always, if you have any specific questions please feel free to . Thanks for your support.